Rendering Text
This guide will show you the basics of rendering text to a window using Velaptor.
Go to the
guide project to see the source code for a fully working example of this guide.Step 1: Create project
Create a basic Velaptor application.
For more info, refer to the Project Setup guide.
Step 2: Setup
Let's setup the game window and create the necessary objects that will be used for rendering, loading content, and perform batching during rendering.
2.1: Create class fields
Create some class fields at the top of the class. These will be used for loading the font, rendering text, and rendering in a batch.
private ILoader<IFont>? fontLoader; // Loads the font content
private IFont? font; // Holds the font
private IFontRenderer? fontRenderer; // Renders text using the font
private IBatcher? batcher; // Renders the text in a batch
2.2: Setup window
Set the window title and size in the Game constructor. This is self explantory.
public Game()
{
    Title = "Render Text Guide";
    Width = 800;
    Height = 800;
}
2.3: Content & rendering objects
Now we can create the font loader, font renderer, and a batcher. These will be used to load the font, render the text, and render the content in a single batch.
Add the following code to the constructor create the class field instances.
public Game()
{
    ...
    this.fontLoader = ContentLoaderFactory.CreateFontLoader();
    this.fontRenderer = RendererFactory.CreateFontRenderer();
    this.batcher = RendererFactory.CreateBatcher();
}
IBatcher thing?Expand me to learn more!
As you might have guessed, this is used for batching. But that does not mean you know what "batching" is right?
Let's fill you in.
Think of a batch as a group of something. Just like a batch of cookies is a group of cookies, a batch of textures is a group of textures. What we are doing is making Velaptor aware that we will be rendering a bunch of textures. By rendering textures together, we mean that all of the textures will be sent to the GPU and rendered all together as a group. Once we are done rendering, we then tell Velaptor that we are finished creating our batch and it can now be rendered to the screen.
This is what the IBatcher object is used for!!
We tell Velaptor that we are ready to start batching by invoking the IBatcher.Begin() method. We then tell Velaptor that
we are done batching by invoking the IBatcher.End() method.
All of the rendering calls using any of the renderers should go between the Begin() and End() method calls.
Just remember the steps:
- Invoke
IBatcher.Begin()method - Invoke all
Render()methods for the current frame - Invoke the
IBatcher.End()method
That's it!!
Step 3: Loading and unload content
Loading and unloading of content is very important!! The content is what will be rendered to the screen, played as sound, or event contain data that will be used by the game.
3.1: Load the font
We need to load the font and to do this we can use a loader. There are various loaders available in Velaptor.
The loader that we need is the ILoader<IFont> loader and this can be created using the ContentLoaderFactory.
Add the following code to the OnLoad() method to create the font loader and load the font.
protected override void OnLoad()
{
    this.font = this.fontLoader.Load("TimesNewRoman-Regular", 24);

    base.OnLoad();
}
Since the name of the content to load is based on the name of the file, renaming the file will break your application!!
The name of the content to load is the same as the content file minus the file extension. You can use or
omit the file extension when using the this.fontLoader.Load() method. Also, the name is not case-sensitive.
Example: The content names 'my-texture' and 'My-Texture' are equivalent.
Expand me to learn more!
Currently, four fonts come built-into Velaptor and are Times New Roman. The 4 different font types are:
- TimesNewRoman-Regular
- TimesNewRoman-Bold
- TimesNewRoman-Italic
- TimesNewRoman-BoldItalic
3.2: Unload the font
Now we can unload the content when the game shuts down. This is to clean up resources that are no longer needed.
To do this, we can override the OnUnload() method. We can then call the Unload() method on the font loader
and send in the IFont class field we created earlier. To do this, we need to add the Velaptor.ExtensionMethods namespace
to the top of the file.
Add the following using statement.
...
using Velaptor.ExtensionMethods; // Add this line here
...
public class Game : Window
{
    ...
}
Now we can override the OnUnload() method and unload the font. It is always a good idea to unload
and release resources when shutting down the game or when switching to a new scene.
protected override void OnUnload()
{
    this.fontLoader.Unload(this.font);
    base.OnUnload();
}
Step 4: Rendering text
4.1: Setup batcher and renderer
Now that we have a text renderer and a font to render text, we need to use the font renderer to render
some text to the screen using our font. Add the code below to the OnDraw() method to accomplish
this.
Note that we need to invoke IBatcher.Begin() before we invoke any Render() methods for
any renderers and then invoke the IBatcher.End() when we are finished with all of our renderings.
The X and Y values are set to 400, 400 which is the center of the window.
protected override void OnDraw(FrameTime frameTime)
{
    this.batcher.Begin();

    this.fontRenderer.Render(this.font, "Hello Velaptor!", 400, 400, Color.White);

    this.batcher.End();

    base.OnDraw(frameTime);
}
Expand me to learn more!
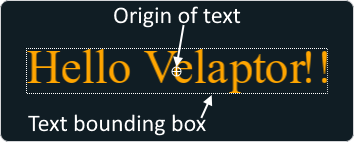
Some game engines and frameworks use the top left corner of an object when rendering at a particular position. Velaptor does not work like that. When rendering text, the position of the text is relative to the center of the entire text or texture content.
What this means is if you render the text at position (0,0), you would only be able to see the bottom right quadrant of the text because the other 3 quadrants would be rendered off-screen!! Make sure to take this into account when it comes to text and object render positioning.
If you call a render method with any renderer before the Begin() method or after the End() method,
you will get an exception!! This is a good thing because you want to know when you are not batching correctly.
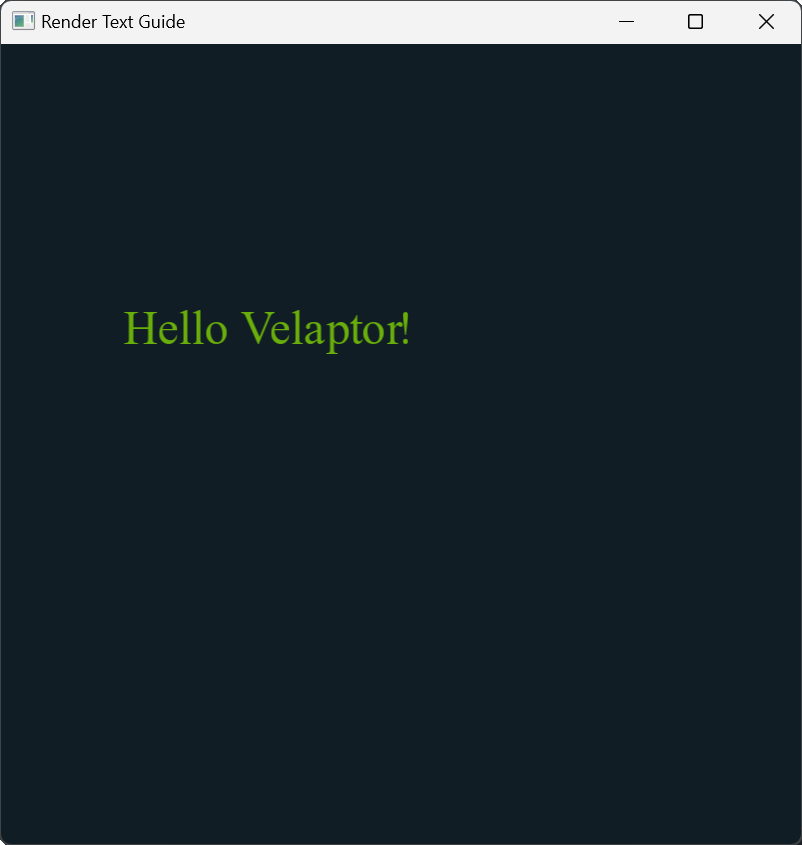
4.2: Run it!
Now for the best part!! Let's see the fruits of your labor and run the application. You should see the result below!! 🥳
Step 5: Bonus!!!
Now it's time to add some polish to what we just did. Let's add some color to the text and make it move around the screen. Better yet, let's move the text around the screen and have it bounce off of the edges of the screen.
Every time the text bounces off the edge of the screen, we can change the color of the text to a random color.
5.1: Class fields
To accomplish the bouncing of the text off the edges of the screen, we need to keep track of the position
and velocity of the text. Also, add the text that will be rendered as a string constant as a class field as well.
You will see where this comes in later.
The velocity is what directly influences the movement of the text. The velocity is a vector that represents the direction and magnitude of the text's movement. The position is the current position of the text on the screen.
public class Game : Window
{
    ...
    private const string Text = "Hello Velaptor!";
    private Vector2 velocity = new (100, 100);
    private Vector2 position = new (400, 400);
    ...
}
5.2: Screen collision detection
To detect if the text is colliding with the edge of the screen, we need to check if the text is outside of the screen's bounds. The screen bounds are made up of the four sides of the screen the left, top, right, and bottom. The left and top locations of the screen are always 0, 0. This is because the origin of the screen area is the top left corner.
As for the right and bottom locations of the screen, we can get those by using the Width and Height properties of the Window class.
Now that we have enough information about the window that represents the 'world' that the text lives in, we need to get some more information
about the text itself. The information we need is the width and height of the text. To get this information, you can use the 'IFont'
content we created in the OnLoad() method.
Font objects have a Measure() method that returns a SizeF type that represents the width and height of the text.
To process all of this information, create a method with the name ProcessCollisionAndColor(). This method will perform both the collision
detection as well as updating the new color of the text on collision.
private void ProcessCollisionAndColor()
{
    var textSize = this.font.Measure(Text);
    var halfWidth = textSize.Width / 2;
    var halfHeight = textSize.Height / 2;

    var leftSide = this.position.X - halfWidth;
    var top = this.position.Y - halfHeight;
    var rightSide = this.position.X + halfWidth;
    var bottom = this.position.Y + halfHeight;

    if (leftSide <= 0)
    {
        this.velocity.X *= -1;
    }

    if (top <= 0)
    {
        this.velocity.Y *= -1;
    }

    if (rightSide >= Width)
    {
        this.velocity.X *= -1;
    }

    if (bottom >= Height)
    {
        this.velocity.Y *= -1;
    }
}
Looking at the code, you can see how the positions of the sides of the text are calculated. Since the position of the text is relative to the center of the text, we need to subtract or add half of the width and height of the text from the position to get the left, top, right, and bottom positions.
With this information, we can then compare it against the sides of the window. If a collision occurs, we just flip the sign of the X and/or Y velocity by negating it. Negating the velocity changes the direction of the text's movement. This is just vector math.
5.3: Update position with collision
Now all we have to do is process the collision and update the position of the text. We can do this in the OnUpdate() method.
In the OnUpdate() method, add the following.
protected override void OnUpdate(FrameTime frameTime)
{
    ProcessCollisionAndColor();
    var displacement = this.velocity * (float)frameTime.ElapsedTime.TotalSeconds;
    this.position += displacement;

    base.OnUpdate(frameTime);
}
First, we process any collision and then we just the updated velocity that determines the direction of the text's movement to help calculate the new position of the text.
To change the speed of the text, we can change the X and Y values of the velocity vector class field.
Remember, velocity is a representation of 2 things, direction and magnitude. The larger the numbers, the faster the text will move. If the number is negative, it will move in the opposite direction of the positive number.
5.4: Changing the color
To change the color, we can use the Random class to generate a random color.
Create 2 more class fields. One for creating random numbers and one for holding the color of the text.
public class Game : Window
{
    ...
    private readonly Random random = new ();
    private Color textColor = Color.White;
    ...
}
Let's make a method with the name RandomizeColor() that will take care of this so we don't have to duplicate so much code. 😉
private void RandomizeColor()
{
    var red = this.random.Next(0, 255); // Create a random red value
    var green = this.random.Next(0, 255); // Create a random green value
    var blue = this.random.Next(0, 255); // Create a random blue value

    // Set the text color
    this.textColor = Color.FromArgb(255, red, green, blue);
}
5.5: Update the color
Now that we have our little helper method, we can use it in the ProcessCollisionAndColor() method.
Add a call to the RandomizeColor() method in each of the if statements that check for a collision.
private void ProcessCollision()
{
    ...
    if (leftSide <= 0)
    {
        this.velocity.X *= -1;
        RandomizeColor(); // Add this line
    }

    if (top <= 0)
    {
        this.velocity.Y *= -1;
        RandomizeColor(); // Add this line
    }

    if (rightSide >= Width)
    {
        this.velocity.X *= -1;
        RandomizeColor(); // Add this line
    }

    if (bottom >= Height)
    {
        this.velocity.Y *= -1;
        RandomizeColor(); // Add this line
    }
}
5.6: Finishing up
Now the exciting part!! Let's update the OnDraw() method to use our position and textColor class fields.
No point in doing all of this hard work if we can see it.
protected override void OnDraw(FrameTime frameTime)
{
    this.batcher.Begin();

    this.fontRenderer.Render(this.font, Text, (int)this.position.X, (int)this.position.Y, this.textColor);

    this.batcher.End();

    base.OnDraw(frameTime);
}
The only change to this method is the Render() call itself. We just swapped out our hard-coded text,
X and Y position, and color with the class fields we created.
Now run the application!!
You should see the text bouncing off the edges of the window and with each bounce, the color should change.